This beginner’s guide helps you remotely connect to Ubuntu from Windows. We show you the easy steps with an example.
If you work in a networked environment at your work or set up a small network at home (wired or wireless), you are often required to remotely connect to your Ubuntu machine (or any Linux machine).
The following steps ideally should work for any Linux distribution which supports Xrdp for remote connection. We have tested it in Ubuntu 22.04 with Windows 11 & 10 and it works fine.
In theory, there are many ways of connecting to any system over the network (internet or intranet). You can use any RDP client, such as Remmina (which is an excellent client), to connect via VNC and RDP protocol. Moreover, you can even connect via ssh with X forwarding as well. You can also check out the list of RDP clients if you want something specific.
In this basic guide, I have used the Xrdp, a free and open-source utility server for Microsoft RDP protocol available in Windows.
Table of Contents
Connect to Ubuntu from Windows via remote desktop
Step 1: Install xrdp in Ubuntu
The following steps do not require any installation or configuration in Windows. Although, you must have enough privileges to run the Microsoft RDP client (mstsc).
In Ubuntu 22.04 (or any Ubuntu version or other similar distributions), install the Xrdp via the terminal using the below commands.
sudo apt install xrdp
If you are using Fedora – use the command below.
sudo dnf install xrdp
And for Arch, use –
pacman -S xrdp
This should install the xrdp server in your Linux system.
Step 2: Enable xrdp service
The next step is to enable the xrdp service. The service must always be running to listen to incoming remote desktop requests. So to do that, run the below command in Ubuntu (and other systemd-based Linux distributions).
systemctl enable xrdp
This systemctl command enables your system to start the service immediately and ensure that it runs automatically the next time you boot.

You might want to check whether the service is running via the below command:
systemctl status xrdp
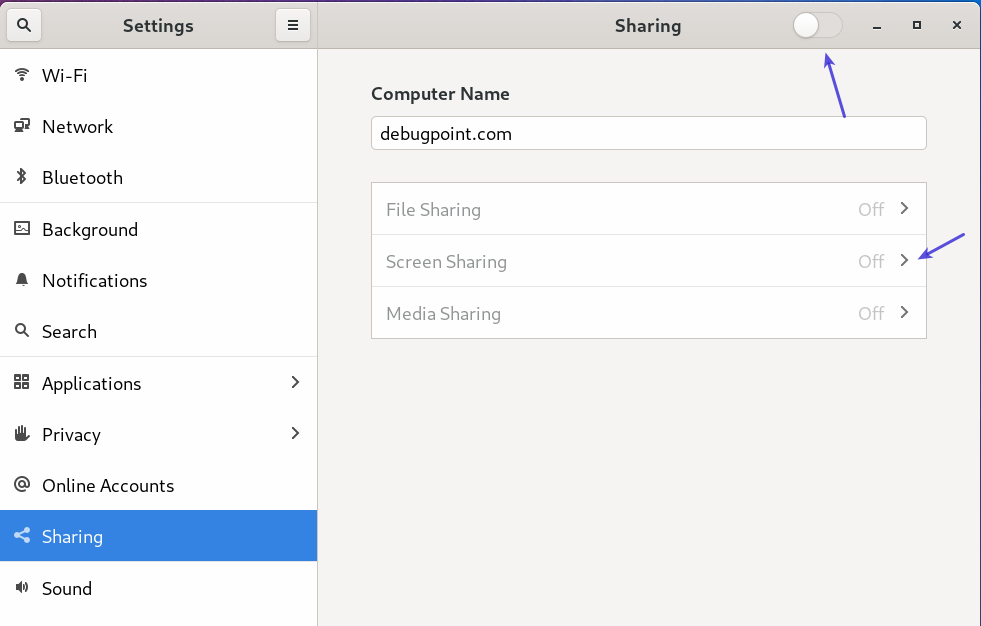
Also, open the Ubuntu settings and Enable Sharing and Enable Screen Sharing. Follow the below screenshots.

Step 3: Connect to Ubuntu
Open the Windows Start menu and type Remote to open the remote connection dialog. You can also press CTRL+R and type mstsc to open the following dialog.

On the above window, give the IP address of the target Ubuntu system (where the xrdp server is running). You can get the IP address from the Settings -> Wifi or Network Section.
Alternatively, you can run ifconfig or ip a to get the IPV4 address of the system.
ifconfig
Or –
ip a
Finally, click connect. You should see the below Xrdp prompt.

Choose the session as xrdp or xvnc. Give the username and password of the Ubuntu system and press OK.
You should be connected to the Ubuntu system.

Usage notes and troubleshooting
- Slow rdp session
The response of the remote session is dependent on your network speed. So you might feel a little bit of slowness on actions (click, scroll, etc.) on the desktop.
- Blank screen on rdp session
Ensure the user has logged off from the target Ubuntu session – which you use for remote connection. If the user logged on and you are connecting – you might see a blank screen (or black screen) in Windows rdp session. This has happened on my test, and I am yet to find out why.
- No customization in rdp session
Ideally, when you log on, a default Xorg profile will be created for the same user. That means you might not see any customizations done by the user. A basic GNOME Shell with all options will be available.
- Repeated Authentication Required popup
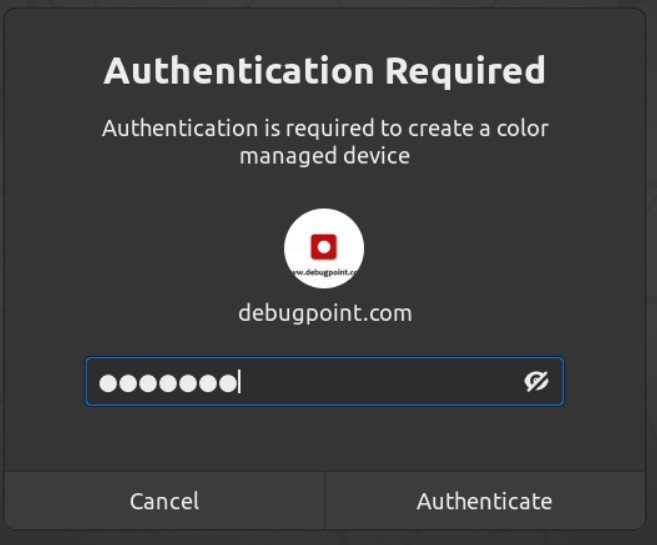
There is a chance that you may see multiple popups (like above) asking for a username and password. The main reason is the implementation of Polkit (a component for controlling system-wide privileges) within Ubuntu. When you log in, Polkit rules check whether the user has certain privileges to perform actions (active or passive). The Polkit rules are more restrictive when connecting via RDP. Hence the popup for Authentication. Fixing this requires a complex Polkit rule setup for the remote RDP users. I am still testing this and am not quite able to fix it.
Wrapping Up
I hope this guide helps you to set up basic RDP from Windows 10 to Ubuntu 20.04. This guide does not require any additional software installation in Windows 10.


