This quick tutorial explains the steps to install and use GNOME Boxes and create virtual machines, with some tips and troubleshooting.
Virtualization is the process of running a virtual instance (rather than an actual one) with an abstracted layer of hardware. In popular terms, it allows you to install and run multiple operating systems (Linux, Windows) simultaneously.
A Virtual machine is a simulated operating system that runs on top of another operating system and uses the same hardware and storage space as the host machine. You can also control the allocated shared memory or space to virtual machines.
Multiple software is available to create virtual machines, e.g. VirtualBox, virt-manager, KVM, Hyper-V, VM Ware player, and GNOME Boxes.
But honestly, most of them are a little complex (for beginners) and sometimes not stable enough. GNOME Boxes is another free and open-source software that is very easy to use and makes it simple for you to create and manage virtual machines by abstracting lots of options.
Table of Contents
Install GNOME Boxes
If you are running Fedora with GNOME Spin, you should already have it installed. However, you can run the below command for Ubuntu, Linux Mint, Kubuntu, and other distributions to install it in your system.
sudo apt install gnome-boxes
Via Flatpak
It is also available via the Flatpak package. I would recommend you use this version. First, set up your system to use Flatpak using this guide, and then run the following command from the terminal to install.
flatpak install flathub org.gnome.Boxes
Create Virtual Machine using GNOME Boxes
- Launch GNOME Boxes from the application menu.
- To create a virtual machine, you need an image (*.ISO) of the operating system you want to virtualize.
- You can download any operating system iso images from the official download page of the distributions. For this guide, I am using Pop! OS, which is an excellent Linux distribution.
- After you launch, click on the “+” icon at the top to start and select “Create a virtual machine”.

In the next window, you can choose already available downloads, or you can select your iso file as OS source. Click on the “Operating system image file” and choose your iso file.
Assign the memory and storage space of your virtual machine. Remember, your virtual machine would take the memory and storage from your host system. So try not to assign as max.
For example, in the below image – I have assigned 2GB memory for the virtual machine (guest) from the total 8GB memory of the host system.
Similarly, choose minimum storage space as well if you want to just test any OS. But if you are creating a virtual machine for servers or serious work, be logical in how much space or memory you want to assign.
Another important thing to remember is that the storage disk space which you allow will be blocked permanently unless you delete the virtual machine. So, you won’t get that much of disk space as free even if your virtual machine doesn’t use the entire allocated space.

Continue with the installation.
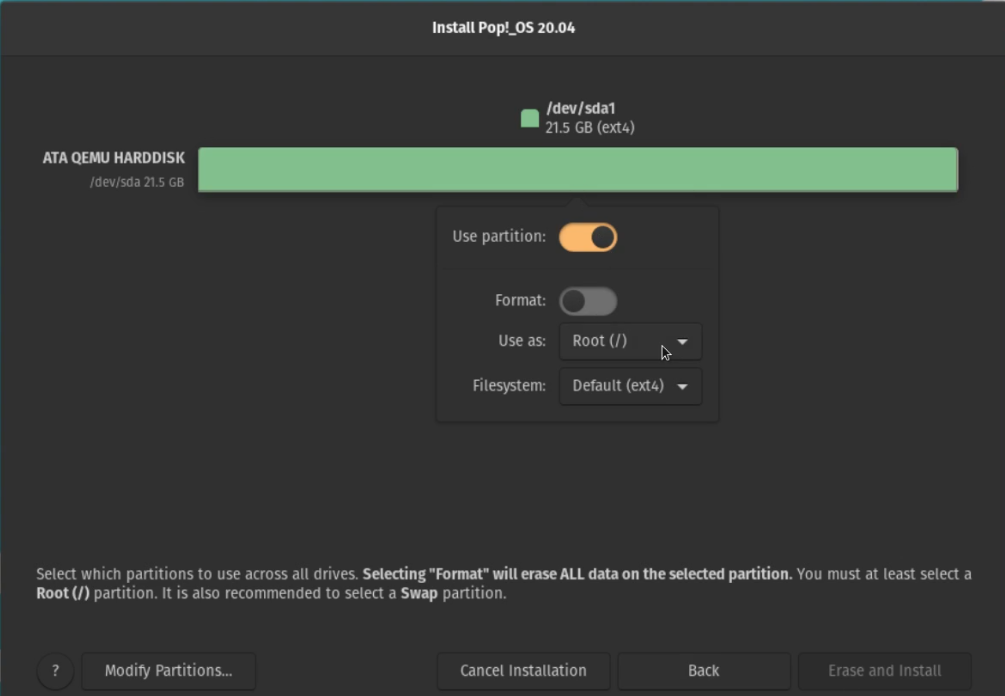
In the partition window, you should see one hard disk and partition, which is the virtual machine disk space. Usually, they are named as /dev/vda or /dev/sda.
Don’t worry; you can play around with this partition, which will not impact your physical disk partitions or any data on your actual host system. Follow the same /root partition while installing Linux, and continue.
After you complete the installation, you should see your new operating system in the virtual machine. In the GNOME Boxes, you should see an entry to the system. You can click once to boot your virtual machine.
You can power off the virtual machine by using your virtual machine operating system’s internal shutdown option.
If you want, you can also delete the virtual machine by choosing the context menu option.

You can also check how much memory and CPU your virtual machine uses from the properties window.
Note that using properties, you can adjust your existing virtual machines’ memory and other items.

Troubleshooting
Here are some common errors or issues you may face while using GNOME Boxes.
1. Display resolution problem in virtual machines
If your virtual machine has low resolution, which is incompatible with your host system, you must install the items below. Open up the terminal in the guest system (not in the host system) and run the below commands.
For Ubuntu-based distributions
sudo apt install spice-vdagent spice-webdavd
For Fedora
sudo dnf install spice-vdagent spice-webdavd
These two packages help to determine proper resolutions, copy/paste between host and guest, share files via public folders, etc.
Once installed, reboot the guest system, Or you can log off and re-login once after reboot; you should see the proper resolution.
2. GNOME Boxes don’t start a virtual machine in Ubuntu 18.04
If you are creating a virtual machine in Boxes 3.34 then you should know that there was a bug that caused your virtual machine to fail to start. To fix that you have to follow some additional steps. Remember these are not required for the latest Boxes 3.36.
Open a terminal window and run the below command to change the qemu config file.
sudo gedit /etc/modprobe.d/qemu-system-x86.conf
Add the below line in the above file and save.
group=kvm
Now, run the below command to add your username to the KVM group.
sudo usermod -a -G kvm <your account name>
Wrapping Up
In this article, you have seen how to install and use GNOME Boxes to take advantage of virtualization. I hope it helps you.
🗨️ If you face any errors or have questions about virtual machines with GNOME Boxes, let me know using the comment box below.


