Debian is a free and open-source GNU/Linux distribution. It is one of the oldest Linux distributions based on the Linux kernel. Today, Debian is known for its stability and serves as the base for many derived distributions, such as Ubuntu.
For beginners, installing Debian 12 “Bookworm” can be overwhelming due to the legacy installer and choosing the ISO files. This guide provides step-by-step instructions with screenshots to simplify the process.
Table of Contents
Minimum System Requirement for Debian
The following are the minimum system requirements for Debian. But it can vary based on what type of box you want to set up.
Minimum RAM: 512MB
Recommended RAM: 2 GB
Processor: 1 GHz
Minimum Disk Space: 10 GB
However, a more realistic requirement for modern systems and desktops is a minimum of 4 GB of RAM, 25 GB of disk space and a CPU not older than ten years.
Install Debian 12 “Bookworm”: Steps
- Installing Debian 12 is split into the below sections; follow them accordingly.
- Downloading ISO files for Debian
- Creating bootable USB
- Prepare partition for dual-boot (optional)
- Install Debian
Download Debian 12 iso image
Visit the following page to download the Debian .iso images.
Debian provides many types of images for installation for all architecture. If you are downloading for the first time, you might get overwhelmed with which file to download. To keep things simple, I have added the following table for you to help you to choose which .iso to download.
| Type | Type of image | Description | Size | Download |
| Free+non Free | netinst CD image | Minimal Size Requires internet connection during installation | ~ 500 MB | iso-cd torrent |
| Free+non Free | full CD | You need the CD 1 only for basic installation | ~ 700 MB | iso-cd torrent |
| Free+non Free | full DVD | You need the DVD 1 only for basic installation | ~ 4 GB | iso-dvd torrent |
If you want other ISO files based on architectures, visit this page and navigate as needed.
Prepare bootable USB
Write the .iso image on a USB stick. There are many ways you can do it. I would recommend using Etcher to write the image. It is available for Windows as well.
After downloading, install Etcher. And write the downloaded ISO file
Prepare a partition to install Debian 12 (for Dual boot systems with Windows)
If you are installing it in the entire disk, Or, want to partition it during installation, you can skip this step.
For those who are installing a fresh Debian 12 with Windows as a dual-boot, follow the below steps to create a partition for Linux installation.
- To create a Windows 10 or 11 recovery disk, use a separate USB stick.
- Insert the empty 16GB+ USB stick into the Windows 10 machine.
- Open Control Panel
- Search with ‘recovery’
- Click on Create a recovery drive.

- Wait till the recovery is complete. Once completed, safely remove the USB stick from the machine.
- You can check whether the recovery stick works by booting from it to be safe.
If you already have a partition that you can use to install Debian, you may want to skip this step.
OEM-installed machines with Windows 10 typically come with two basic partitions (excluding the recovery partitions). C:\ and D:\. C Drive contains Windows 10 or Windows 11 system files, and D Drive is reserved for user data. Debian 12 needs a minimum of 30GB storage space partition, which we need to create by shrinking C:\ drive, which typically contains most of the space. Follow the below steps to create a partition for Debian.
- Open the partition editor from the START menu by searching ‘partition’.
- Right-click on C Drive and click ‘Shrink Volume’.

- In the next window, you can see the available size available in MB. Enter the value as per your need in MB in the ‘amount of space to shrink in MB’.
Tip: If you need 50 GB for partition – enter 50*1024= 51200 MB

- Click ‘Shrink’ and wait until it finishes.
- You will see an unallocated space created in a graphical display of your storage. This space would be used to install Debian. Do not format now, as the Debian 12 installer would allow you to format during installation.
The above screenshots are an example which might be different for your system.
- Once the partition is created, plugin the USB stick into your target system and restart.
- Press F2 or any other OEM-specific function key to enter into BIOS.
- In the BIOS, make sure the boot priority is set to the USB stick which you created for Debian 12.
- Press F10 in the BIOS to save and exit.
Install the system
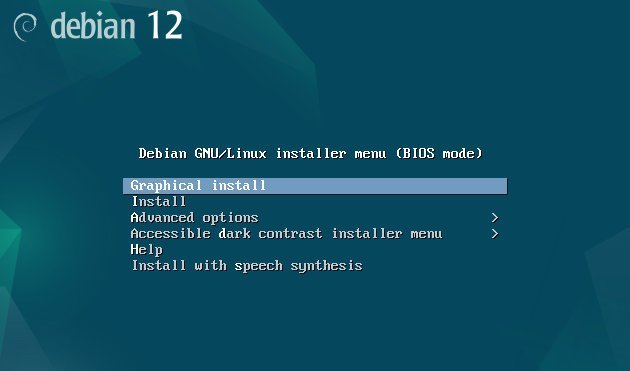
After booting from the LIVE USB, select the Graphical Install option.
Following the on-screen instructions to choose Language, Country and Keyboard layouts.
Once the Network selection page comes, select the Wireless or Wired network. If you are using the DVD ISO file, then I recommend not to connect to any network. Because Debian mirrors are sometimes slow and delay your installation process.
Enter the password for the “root” account.
You must create one user account for Debian Linux. Enter the username and password.

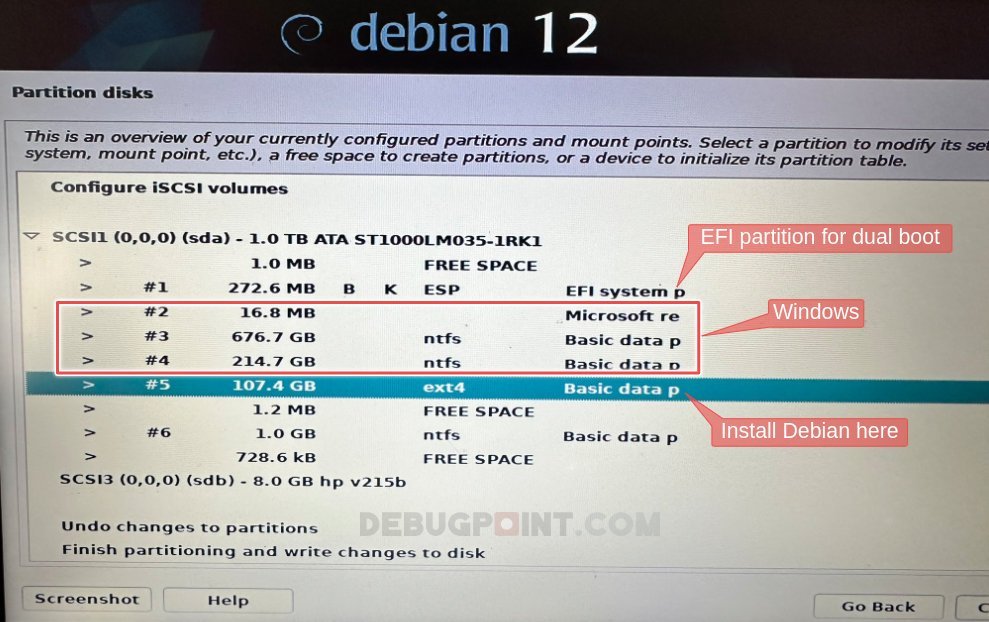
On the partition disk page, select “Manual”.

When you choose manual partitioning, the installer will scan your disk and show you the entire partition table. Ensure you have EFI partition and Windows partition untouched. Select the free space which you have created earlier OR choose the existing target partition to install Debian 12.
Here’s an example:
Select and hit enter to bring up the detailed screen for that partition. Choose format the partition and mount point to root i.e. “/”. Keep all other values unchanged. Once done, select “Done setting up the partition” and hit enter.
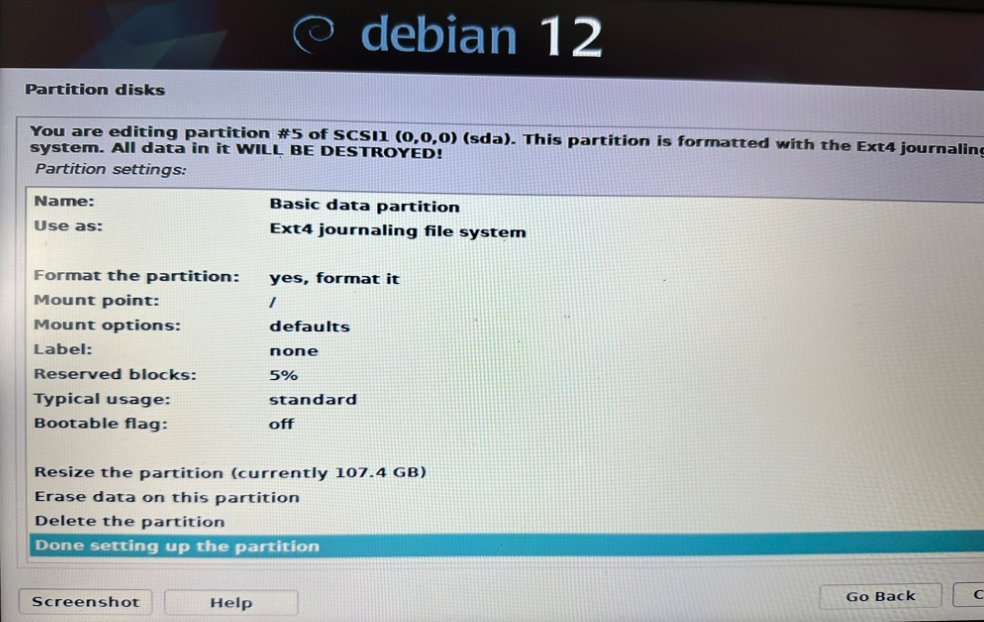
You should clearly see the “F” and the mount point “/” beside your target partition.

Once you are ready, select “Finish partitioning and write changes to disk”. Be careful before you hit enter because it will physically make changes to your disk.
The installation will start and wait until the next prompt.

In the next series of prompts, choose:
- Scan extra installation media=NO
- Use a network mirror=NO
- Participate in package usage survey=NO
Debian 12 features all the leading desktop environments. Choose the one you want in the below screen and click continue. On the next display manager screen, choose “lightdm” for all except KDE. If yo choose KDE Plasma, use “sddm”.

At the final screen, choose to install the GRUB boot loader to the primary drive.
Wait for the installation to finish. At the final screen, select continue, and the installer will reboot your system. Unplug the USB device.

If all goes well, you should see the Debian 12 GRUB menu. You can now login to the new Debian 12 system using the user name and password.

Closing Notes
I hope this guide helped you to install and configure a Basic Debian 12 “Bookworm” system. Debian is a massive operating system with many options. Try the one best for you.
If you are stuck with some errors, drop a comment below.
After completion, do try to check out our guide: 10 Things to do after installing Debian 12.


